How to Wash Dental 3D Prints: A Practical Guide to IPA Cleaning Before Post-Cure
Short answer: Washing a dental 3D print means removing the uncured resin left on the part's surface with isopropyl alcohol (IPA) before post-curing. For many of the resins 3mash supplies, the recommended sequence is a pre-wash and a final wash in IPA of at least 98% purity, followed by complete drying and UV post-cure. Washing does not replace curing; the two are consecutive steps in the same workflow.
A dental print isn't finished when the printer stops. A model, splint or surgical guide fresh off the build plate still carries a film of uncured resin. If that film goes into the curing unit, the surface can stay tacky, fine details can fill in, and the final part may not turn out as expected. In this guide we cover what washing is, how to do it properly, and the mistakes we see most often.
What is post-print washing, and why does it matter?
Washing is necessary because the thin layer of unhardened resin on the part's surface has to be removed before curing. During printing, every surface of the part is in contact with liquid resin. The light-cured portion forms the part itself, while the thin film left on the surface has not yet hardened. If it isn't removed, it bonds to the part during curing and leaves the surface rough or sticky. After a proper wash, only the part itself hardens during post-cure.
How do you wash a dental print with IPA?
An IPA wash consists of a pre-wash, a final rinse in cleaner alcohol, and complete drying. Most dental resin manufacturers recommend washing in IPA before curing, and for many of the 3mash dental 3D printing resins a pre-wash and final wash in IPA of at least 98% purity is advised. Because washing parameters can differ from resin to resin, always follow the instructions on the product page of the resin you are using.
Step-by-step IPA wash
Carefully remove the part from the build plate.
Pre-wash: wash the part in the first IPA container to remove most of the surface resin.
Final wash: rinse the part in a second container with cleaner IPA, so that contaminated alcohol doesn't redeposit resin on the part.
For crowns, splints and hollow parts, make sure recesses and internal surfaces are also reached by the alcohol.
Let the part dry completely before curing.
Post-cure the part with UV as recommended for the resin.
When should the wash IPA be replaced?
IPA saturated with resin no longer cleans effectively, so the condition of the alcohol in your containers needs regular monitoring. Decide when to replace it based on the manufacturer's recommendation and your own workload. Keeping the more contaminated alcohol in the pre-wash container and using cleaner alcohol for the final wash fits the logic of the two-stage setup.
Why shouldn't drying be skipped?
Curing a part that is still wet or holding alcohol can increase the risk of whitening and staining on the surface. Make sure the part is completely dry before it goes into the curing unit.
When should you use an ultrasonic cleaner?
An ultrasonic cleaner is useful when IPA needs to reach recessed, hard-to-access areas, provided the resin is compatible with it. The agitation helps the alcohol work its way into fine detail. Some resins, such as Mash Study, are compatible with ultrasonic cleaning, but you should still check the product page for each resin. Rather than extending wash time without control, it is safer to adjust it to the resin and part geometry within the manufacturer's recommendations. For labs and clinics, the Mash W1E ultrasonic cleaner is one option built for this step.
In what order should washing and curing be done?
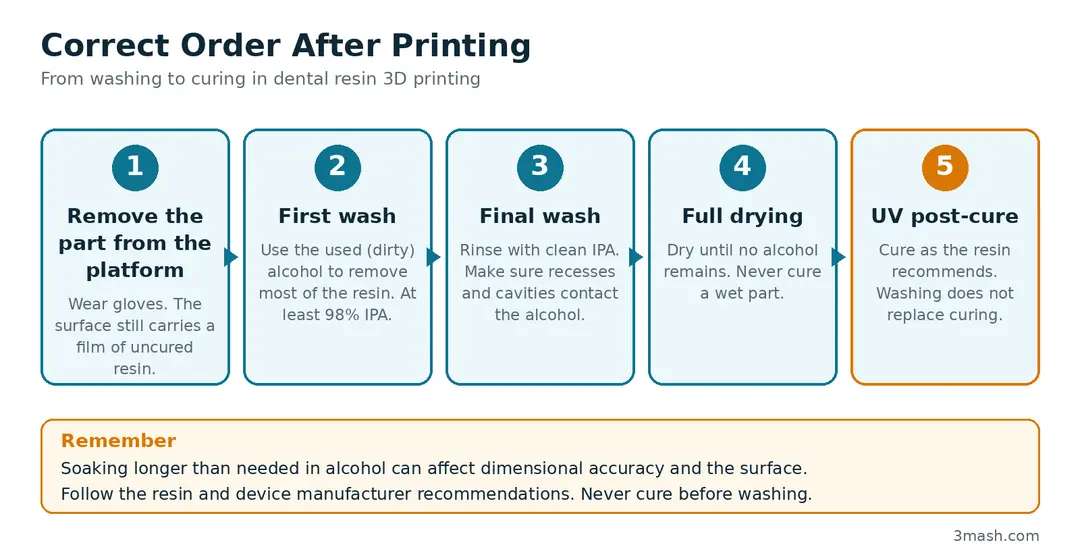
The correct order is: print, two-stage IPA wash, complete drying, then UV post-cure as recommended for the resin. For composite-based restorations, glazing and a final cure are added to the chain; see our curing and glazing guide for details. Post-curing after washing is also the step that improves the part's mechanical strength, which is why washing and curing are sequential steps, not alternatives.
Figure 1: Process sequence
What are the most common washing mistakes?
The most common mistakes are skipping post-cure, reversing the order, working with dirty alcohol, getting alcohol into the printer's resin tank, and confusing washing problems with curing problems.
Washing without curing: a washed part is not a finished part. The curing step recommended for the resin must follow the wash.
Curing before washing: the surface resin film hardens onto the part and becomes much harder to remove.
Using heavily contaminated alcohol: instead of cleaning, you end up depositing a new layer of resin on the surface.
Getting alcohol into the printer tank: don't wipe the FEP film of the resin tank with alcohol or a wet cloth; follow the printer and tank instructions.
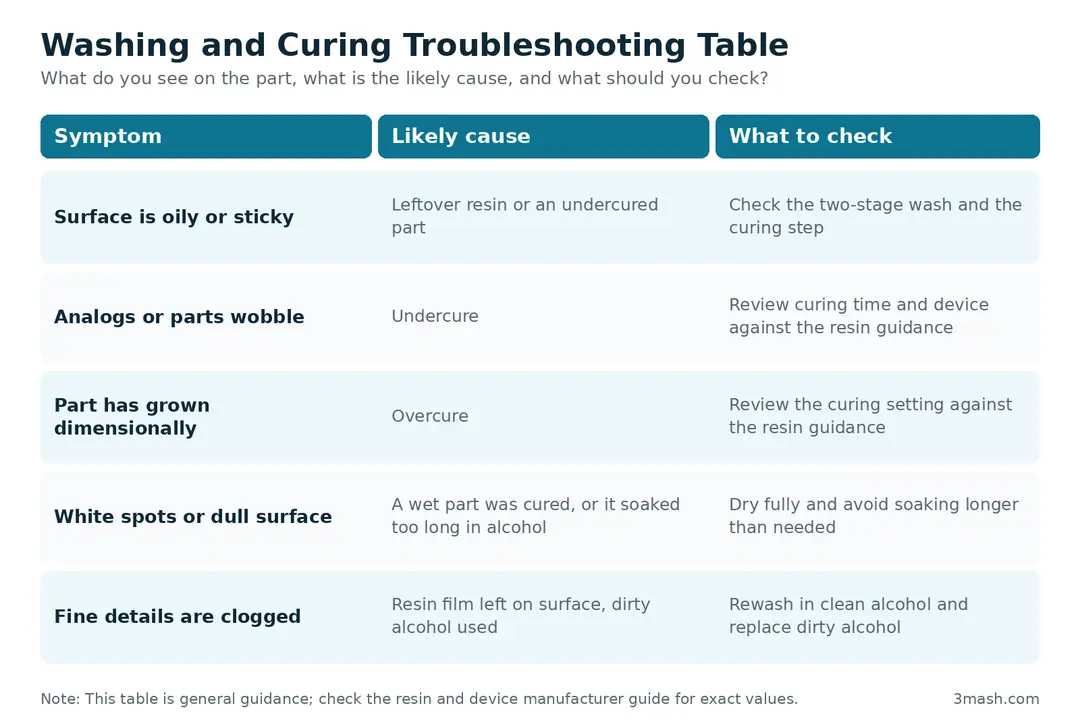
Confusing washing and curing issues: an oily or tacky surface is often a sign of undercure, while a part that grows dimensionally points to overcure. We cover this in detail in our overcure and undercure guide.
Figure 2: Troubleshooting table
How do you choose washing equipment?
Washing equipment should be chosen based on your volume, the types of parts you produce and the resin you use. For a small number of parts, simple containers with lids may be enough; in labs with regular production, ultrasonic cleaners and wash-and-cure stations streamline the workflow. 3mash offers both types of equipment. Before choosing, we recommend checking the washing instructions on your resin's product page.
Conclusion
Consistent, correct washing is a simple habit that protects print quality, makes post-cure trouble-free and gets the part ready for clinical use. For washing and curing parameters specific to your resin and equipment, the 3mash technical support team is available 24/7.
Frequently asked questions
What alcohol should be used to wash dental 3D prints?
For many of the resins 3mash supplies, isopropyl alcohol (IPA) of at least 98% purity is recommended. Always follow the instructions on your resin's product page.
Does washing replace post-curing?
No. Washing only removes uncured resin from the surface; the part needs the UV post-cure recommended for its resin to be finished and reach its mechanical strength.
Can a part be cured while it is still wet?
It isn't recommended. The part should be completely dry before curing; curing a wet or alcohol-soaked part can increase the risk of whitening and staining.
Can an ultrasonic cleaner be used with every resin?
Not every resin has the same instructions. Some resins, such as Mash Study, are compatible with ultrasonic cleaners; for others, check the product page and set the time according to the manufacturer's recommendation.
What should I do if the surface is still tacky after washing and curing?
An oily or tacky surface is often a sign of undercure. First check that curing was completed as recommended for the resin, then confirm that the wash was done in two stages with clean alcohol.